目录
一、React表单与事件
1、React表单组件
(1)受控组件与非受控组件——笔试题
(2)更多受控组件
2、React事件
(1)事件类型
(2)事件对象
(3)事件绑定——this为unde
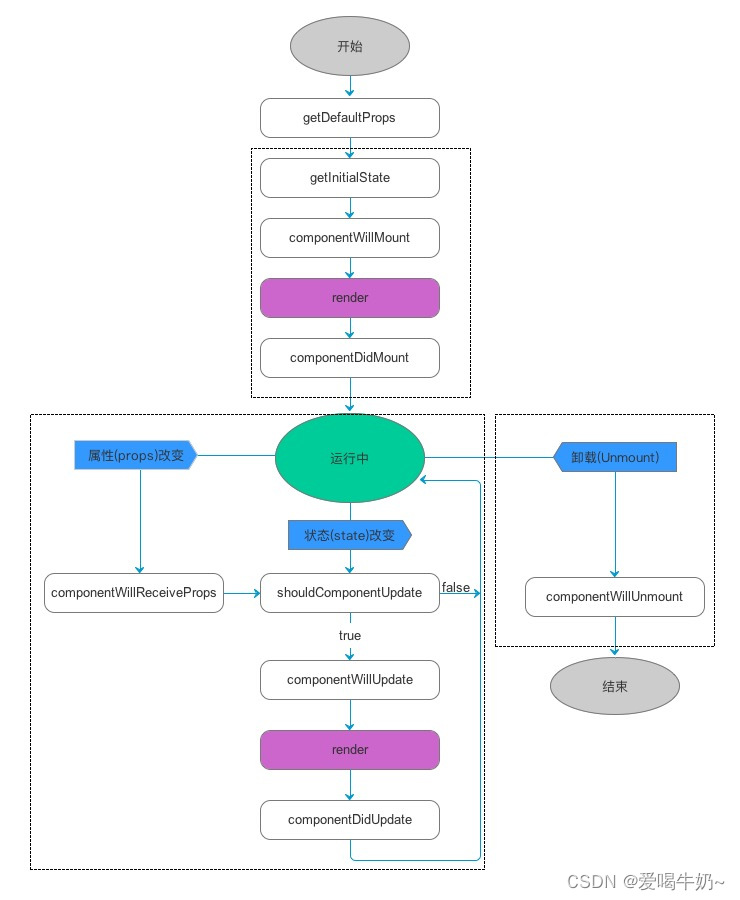
二、React组件生命周期
1、组件的生命周期
2、生命周期钩子详解
- **componentWillMount** :
- **componentDidMount** :
- **componentWillReceiveProps** :
- **shouldComponentUpdate** :
- **componentWillUpdate**:
render函数 在这中间执行
- **componentDidUpdate** :
- **componentWillUnmount**:
3、生命周期钩子——网络请求
1、React表单组件
在HTML中,表单元素与其他元素最大的不同是它自带值或数据
而且,只要是有表单出现的地方,就会有用户输入,表单事件触发,就会涉及的数据处理。
在我们用React开发应用时,为了更好地管理应用中的数据,响应用户的输入,编写组件的时候呢,我们就会运用到**受控组件与非受控组件**这两个概念。
React推荐我们在绝大多数情况下都使用受控组件。这样可以保证表单的数据在组件的state管理之下,而不是各自独立保有各自的数据。
(1)受控组件与非受控组件——笔试题
没有v-model,需要自己去实现
**受控组件**简单来说就是它的值由React进行管理,
而**非受控组件**的值则由原生DOM进行管理。
- 受控组件:==>双向
一般涉及到表单元素时我们才会使用这种分类方法。
受控组件的值由props或state传入给受控组件(表单的输入框),用户在元素上交互或输入内容会引起应用state的改变。
在state改变之后重新渲染组件,我们才能在页面中看到元素中值的变化,
假如组件没有绑定事件处理函数改变state,用户的输入是不会起到任何效果的,这也就是“受控”的含义所在。
- 非受控组件:==>单向
类似于传统的DOM表单控件,用户输入不会直接引起应用state的变化,我们也不会直接为非受控组件传入值。
想要获取非受控组件,我们需要使用一个特殊的ref属性,同样也可以使用defaultValue属性来为其指定一次性的默认值。
示例如下:
import React from "react" class App extends React.Component { constructor(arg) { super(arg) this.state = {} this.handleChange = (e) => { this.setState({ value: e.target.value }); // e.target.value就是输入的值 } } render() { return ( <div> {/* 1、受控组件 */} <input type='text' value={this.state.value} onChange={this.handleChange} /> {/* 2、非受控组件 */} <input type="text" value={this.state.value} /> {/* 如果上没有onChange事件,输入框不能输入,value会一直是this.state.value */} <input type="text" defaultValue="hello!" /> </div> ) } } export default App(2)更多受控组件
在组件中声明表单元素(input_type/checked textarea select ……)时,一般都要为表单元素传入应用状态中的值,我们需要根据表单元素中用户的输入,对应用数据进行相应的操作和改变。
1、radio:
class MyApp extends React.Component { constructor(props) { super(props); this.state = { gender: '' }; this.handleGender = this.handleGender.bind(this); } handleGender(event) { this.setState({gender: event.target.value}); } render() { return ( <div> <h2>input_checked 受控组件</h2> <input type='radio' value="man" checked={this.state.gender=='man'} onChange={this.handleGender}/>男<br /> <input type='radio' value="woman" checked={this.state.gender=='woman'} onChange={this.handleGender}/>女<br /> <div>{this.state.gender}</div> </div> ); } } ReactDOM.render( <MyApp />, document.getElementById('root') );2、mycheck:
import React, { Component } from 'react' export default class Mycheck extends Component { constructor(){ super() this.state={ chengdu:true } this.chengduchange=(e)=>{ console.log(e.target.checked) this.state.chengdu=e.target.checked this.setState(this.state) } } render() { return ( <div> <input type="checkbox" name='city' value="chengdu" checked={this.state.chengdu} onChange={this.chengduchange}/> <input type="checkbox" name='city' value="shanghai"/> <input type="checkbox" name='city' value="beijing"/> <input type="checkbox" name='city' value="tianjing"/> </div> ) } } 3、mydata
import React, { Component } from 'react' export default class Mydate extends Component { constructor(){ super() this.state={ v:"2021-11-11" } this.change1=(e)=>{ console.log(e.target.value) this.state.v=e.target.value this.setState(this.state) } } render() { return ( <div> <input type="date" value={this.state.v} onChange={this.change1}/> </div> ) } } 4、myfile
import React, { Component } from 'react' export default class Myfile extends Component { constructor(){ super() this.state={ v:"" } this.change1=(e)=>{ console.log(e.target.files[0]) this.state.v=e.target.files[0] this.setState(this.state) } } render() { return ( <div> <input type="file" onChange={this.change1}/> </div> ) } } 5、myselect
import React, { Component } from 'react' export default class Myselect extends Component { constructor(){ super() this.state={ v:"beijing" } this.change1=(e)=>{ console.log(e.target.value) this.state.v=e.target.value this.setState(this.state) } this.send=()=>{ console.log(this.state.v) } } render() { return ( <div> <select name="city" value={this.state.v} onChange={this.change1}> <option value="chengdu">成都</option> <option value="beijing">北京</option> <option value="shanghai">上海</option> </select> <button onClick={this.send}>发送</button> </div> ) } } 7、mytext
import React, { Component } from 'react' export default class Mytext extends Component { constructor(arg){ super(arg) this.state={msg:"66666"} this.input1=(e)=>{ console.log(e.target.value) this.state.msg=e.target.value this.setState(this.state) } } render() { return ( <div> <p>{this.state.msg}</p> <input type="text" value={this.state.msg} onInput={this.input1} /> <input type="text" /> </div> ) } } 2、React事件
(1)事件类型
使用React元素处理事件与处理DOM元素上的事件非常相似。不过有一些语法上的差异:
- React事件使用**小驼峰命名法**,而不是全部小写命名。
- React事件使用JSX传递一个函数作为事件处理程序,而不是一个字符串。示例:
- 鼠标事件:onClick onDoubleClick onMouseDown
- 触摸事件:onTouchStart onTouchMove onTouchEnd
- 键盘事件:onKeyDown
- 剪切事件:onCopy onCut onPaste
- 表单事件:onChange onInput onSubmit
- 焦点事件:onFocus
- UI事件:onScroll
- 滚动事件:onWheel
(2)事件对象
构造函数:fun
- React对原生的事件系统也进行了封装,在React中的事件对象实际上是一个跨浏览器的**虚拟事件对象** ,它拥有和原生事件对象相同的属性和方法。
- 在react 中使用“return false” 无法阻止默认事件,只能通过事件对象调用“event.preventDefault() ”进行阻止
class ClickEvent extends React.Component { constructor(props) { super(props); this.state = { value: 'hello world' }; //函数写法==> 方法1: this.changeData = this.changeData.bind(this); //方法2: this.fm=()=>{} } //方法3: changeData(event) { //changeData函数也可以写在构造函数constructor内,写this.changeData都能调用到这个给函数 console.log(event) this.setState({value: '萨瓦迪卡'}); } fn(arg){} //方法4: fn1=function(){} //方法5: fn2=()=>{} render() { return ( <div> <button onClick={this.changeData}>点击改变</button> <h2>{this.state.value}</h2> //方法6:因为react中函数不能写小括号,所以自己设计,去实现有小括号,传参 <button onClick={(e)=>{this.fn(100)}}>函数传参</button> </div> ); } }(3)事件绑定——this为unde
事件处理函数内部使用this 关键词时其指向==>
class ClickEvent extends React.Component { constructor(arg) { super(arg) this.changeData=function (){console.log(this);} //undefined } changeData() { console.log(this);//undefined } render() { return ( <div> <button onClick={this.changeData}>点击改变</button> </div> ); } }解决方法:
1、将函数写在constructor 内部,对事件处理函数bind 绑定this(官方推荐)
2、 每次事件绑定都对事件处理函数做bind 绑定
3、定义事件处理函数时使用箭头函数
<button onClick={e=>this.changeData.call(this)}>点击改变</button>当事件处理函数需要传参时:
<button onClick={this.changeData.bind(this,id)}>点击改变</button> //将changeData处理为有this <h2>{e=>this.changeData.call(id,event)}</h2> //又想传参又要处理this,就用call
import React, { Component } from 'react' export default class App extends Component { constructor() { super() this.fn = () => { console.log(1111, this.state) } this.fn3 = function () { console.log(333, this.state) }.bind(this) // this.state={} } fn2() { console.log(2222, this.state) } fn4 = function () { console.log(44444, this) } fn5 = () => { console.log(555, this) } fn6(arg) { console.log(arg) } fn7(id) { console.log(id) } state = { msg: "hello", arr: [{ id: 123, title: "a" }, { id: 124, title: "bb" }] } render() { return ( <div> <button onClick={this.fn}>btn</button> <button onClick={this.fn2.bind(this)}>btn2</button> <button onClick={this.fn3}>btn3</button> <button onClick={this.fn4.bind(this)}>btn4</button> {/* <button onClick={(e)=>{this.fn4(this,e)}}>btn4</button> */} <p>{this.state.msg}</p> <button onClick={this.fn5}>btn5</button> <button onClick={(e) => { this.fn6(100) }}>btn6</button> { this.state.arr.map(el => (<div key={el.id}> <p>{el.title}</p> <button onClick={(e) => { this.fn7(el.id) }}>btn</button> </div>)) } </div> ) } } render函数 在页面初次加载的时候,会运行;数据每改变一次,页面刷新的时候也会运行。
构造函数只会调用一次,从创建到销毁都只调用一次。
1、组件的生命周期
- Mounting:已插入真实 DOM
- Updating:正在被重新渲染
- Unmounting:已移出真实 DOM
-
组件创建阶段(初始加载):一辈子只执行一次 构造函数(有争议,因为构造函数不算生命周期函数)、componentWillMount: render: componentDidMount:
-
组件运行阶段:按需,根据props 属性或state 状态的改变,有选择性的执行0 到多次 componentWillReceiveProps: shouldComponentUpdate: componentWillUpdate: render: componentDidUpdate:
-
组件销毁阶段:一辈子只执行一次
-
因为没有了创建前后,想做预加载,就在构造函数或者componentWillMount中做
2、生命周期钩子详解
定义:在特定的阶段,你刚刚自动执行的函数(方法)
- **componentWillMount** :
在渲染前调用,在客户端也在服务端。
- **componentDidMount** :在**第一次渲染后**调用,只在客户端。之后组件已经生成了对应的DOM结构,可以通过this.getDOMNode()来进行访问。 如果你想和其他JavaScript框架一起使用,可以在这个方法中调用setTimeout, setInterval或者发送AJAX请求等操作(防止异部操作阻塞UI)。
- **componentWillReceiveProps** :在组件接收到一个新的 prop (更新后)时被调用。这个方法在初始化render时不会被调用。
- **shouldComponentUpdate** :自己判断是否需要刷新
返回一个布尔值。在组件接收到新的props或者state时被调用。在初始化时或者使用forceUpdate时不被调用。 可以在你确认不需要更新组件时使用。
- **componentWillUpdate**:准备更新
在组件接收到新的props或者state但还没有render时被调用。在初始化时不会被调用。
render函数 在这中间执行
- **componentDidUpdate** :已经更新,数据已经改完了
在组件完成更新后立即调用。在初始化时不会被调用。
- **componentWillUnmount**:即将销毁
在组件从 DOM 中移除的时候立刻被调用。
class MyApp extends React.Component { constructor(props) { super(props); this.state = { date: new Date() }; } //通过componentDidMount 方法设置一个定时器,每隔1秒重新设置时间,并重新渲染: componentDidMount() { var oThis=this; clearInterval(this.timer); this.timer=setInterval(function() { oThis.setState({ date: new Date() }) }, 1000) } render(){ return ( <h2>{this.state.date.toLocaleTimeString()}</h2> ); } }父组件的状态传递到子组件的属性中
class Content extends React.Component { //在渲染前调用,在客户端也在服务端 componentWillMount() { console.log('Component WILL MOUNT!') } //在第一次渲染后调用,只在客户端 componentDidMount() { console.log('Component DID MOUNT!') } //在组件接收到一个新的 prop (更新后)时被调用 componentWillReceiveProps(newProps) { console.log('Component WILL RECEIVE PROPS!') } //在组件接收到新的props或者state时被调用 shouldComponentUpdate(newProps, newState) { return true; } //在组件接收到新的props或者state但还没有render时被调用 componentWillUpdate(nextProps, nextState) { console.log('Component WILL UPDATE!'); } //在组件完成更新后立即调用 componentDidUpdate(prevProps, prevState) { console.log('Component DID UPDATE!') } //在组件从 DOM 中移除的时候立刻被调用 componentWillUnmount() { console.log('Component WILL UNMOUNT!') } render() { return ( <div> <h3>{this.props.myNumber}</h3> </div> ); } } class MyApp extends React.Component { constructor(props) { super(props); //声明状态 this.state = { data: 0, isRender: true }; this.setNewNumber = this.setNewNumber.bind(this); this.deleteDOM = this.deleteDOM.bind(this); } //改变状态值并传递到子组件 setNewNumber() { this.setState({data: this.state.data + 1}); } //删除子组件 deleteDOM() { this.setState({isRender: false}) } render() { return ( <div> <button onClick={this.setNewNumber}>点我改变状态</button> <button onClick={this.deleteDOM}>点我删除子组件</button> { this.state.isRender ? <Content myNumber={this.state.data} /> : null } </div> ); } } ReactDOM.render( <div> <MyApp /> </div>, document.getElementById('root') );import React, { Component } from 'react' export default class Box extends Component { constructor() { super() this.state = { count: 2, token: "abcdqwe" } this.increment1 = function () { this.setState({ count: this.state.count + 1 }) } this.changetoken = function () { this.setState({ token: "abcdqwe2" }) } console.log("constructor") } render() { console.log("render--box") return ( <div> <p>{this.state.count}</p> <button onClick={this.increment1.bind(this)}>count++</button> <button onClick={this.changetoken.bind(this)}>change_token</button> </div> ) } componentWillMount() { console.log("componentWillMount") } componentWillReceiveProps() { console.log("componentWillReceiveProps") } componentDidMount() { console.log("componentDidMount") } componentWillUpdate() { console.log("componentWillUpdate") } shouldComponentUpdate() { console.log("shouldComponentUpdate", arguments) //只有传入的有count而是是新值 才更新 if (arguments[1].count && arguments[1].count != this.state.count) { return true } else { return false } } componentDidUpdate() { console.log("componentDidUpdate") } componentWillUnmount() { console.log("componentWillUnmount") } } 3、生命周期钩子——网络请求
componentDidMount
import React, { Component } from 'react' export default class Box2 extends Component { state={ arr:[] } render() { return ( <div> <h1>box2</h1> { this.state.arr.map(el=><div>{el.title}----{el.age}</div>) } </div> ) } componentDidMount(){ fetch("http://192.168.6.78:7001/test").then(res=>res.json()) .then(data=>{ console.log(data) this.state.arr=data this.setState(this.state) }) } }